Version: 3.3.0
Build id: I20070621-1340
This product includes software developed by the
I will create a simple calculator service with 4 simple service functions to manipulate addition, subtraction, division and multiplication of two given real numbers.
- getSummation(double num1, double num2)
- getSubtraction(double num1, double num2)
- getDivision (double num1, double num2)
- getMultiplication(double num1, double num2)
Step 1: Create a dynamic web project.
1. Open your eclipse IDE with new work space for clarity. Then change your perspective to Java EE by selecting Window -> Open Perspective -> Other
2. Go to Window -> Show View -> Project Explorer.
3. Then Click on Mouse Right Button on Project explorer window and select New - > Project.
4. In New project wizard select Dynamic Web Project and click Next.
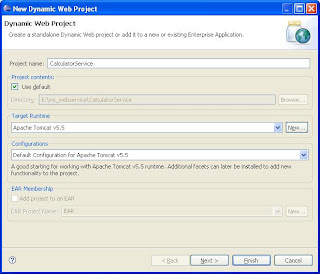
5. In Dynamic Web Project wizard provide project name (Ex: CalculatorService).
6. If you already define target run time select it or click on New button to add target run time.
7. In New Server Runtime wizard select your server.(I will select Apache Tomcat 5.5 since i have installed it.) and click Next.
8. Browse and select for Tomcat Installation Directory (Ex: C:\Program Files\Apache Software Foundation\Tomcat 5.5). To add new Java Runtime Environment click on Installed JREs and click on Add buttons and provide JRE home directory,or used your workbench default JRE and click Finish.
9. In Configuration section keep default value as shown bellow and click Finish to complete dynamic web project creation.
10. Now you can see in Project Explorer window with created dynamic project folder content and servers as,
Go to Window -> Show View -> Others -> Server -> Servers to get available Servers in your workspace and double click on the server already added in server explorer window to open configuration. Under Server location select option "Use Tomcat installation (take control of Tomcat installation)".
11. Mouse RB click on java resource section in project explorer and add new package(Ex: org.blog.webservice)
Step 2: Create a simple Calculator class.
12. Mouse RB click on above created package and add new Class Calculator with following code.
package org.blog.webservice;
/**
*
* @author WGPM Rangalal
*
* Axis Service Sample.
*
* Visit http://rangalal.blogspot.com/
*/
public class Calculator {
public double getSummation(double num1, double num2) {
return num1 + num2;
}
public double getSubtraction(double num1, double num2) {
return num1 - num2;
}
public double getMultiplication(double num1, double num2) {
return num1 * num2;
}
public double getDivision(double num1, double num2) {
if (num2 != 0)
return num1 / num2;
else
return -1;
}
}
Step 3: Create an axis service from this class.
13. Mouse RB click on Calculator class in project explorer and select New -> Other ->Web Services wizard and select Web Service on that wizard and click Next.
14. Select Web Service Runtime as Apache Axis 2
15. Select web server run time as Apache Axis2 and server as Tomcat 5.5 under existing servers and click OK.
16. select check box Publish the Web service in step 14 and click Next. You will end up with flowing error message. Click on Detail button to see more description about error.
17. To Solve above error download axis2.war file and copy it to
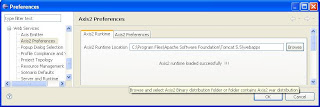
18. Select Axis2 Runtime tab and browse for axis2.war content directory (Ex: C:\Program Files\Apache Software Foundation\Tomcat 5.5\webapps). Then wizard will load the runtime and you will display following message. "Axis2 runtime loaded sucsesfully !!!"
19. Now start step 3 (13 - 15) and click Next. then wizard will load the axis2 runtime to dynamic web prokect webcontent directory.
20. In Axis2 Web Service Java Bean Configuration select option Generated default services.xml file and click Next.
21. Then click Start server button to start server.
22. After server start click Next button and if you want you can publish your web service at UDDI (Universal Description, Discovery and Integration)and click finish.
23. Now is time to Check Your Deployed Web Service.


A Use full article. can you further describe how we can access deployed web service and how to write web service client
ReplyDeleteRegards,
Amila.
This blog is very helpfull to write web service in practically...
ReplyDeleteThanks Rangalal
Thank You Very Much...........